AWS Sagemaker Guide for Beginners (2) | Using Custom Models in Sagemaker
in MLOps

How to deploy custom models in Sagemaker
Deploying Custom Models in Sagemaker
Sagemaker 🩵 Docker Container
- Before learning how to deploy custom models in the Sagemaker environment, it’s beneficial to understand how Sagemaker utilizes Docker Containers when deploying models.
- Below is a flowchart showing how Sagemaker Endpoints leverage docker containers.
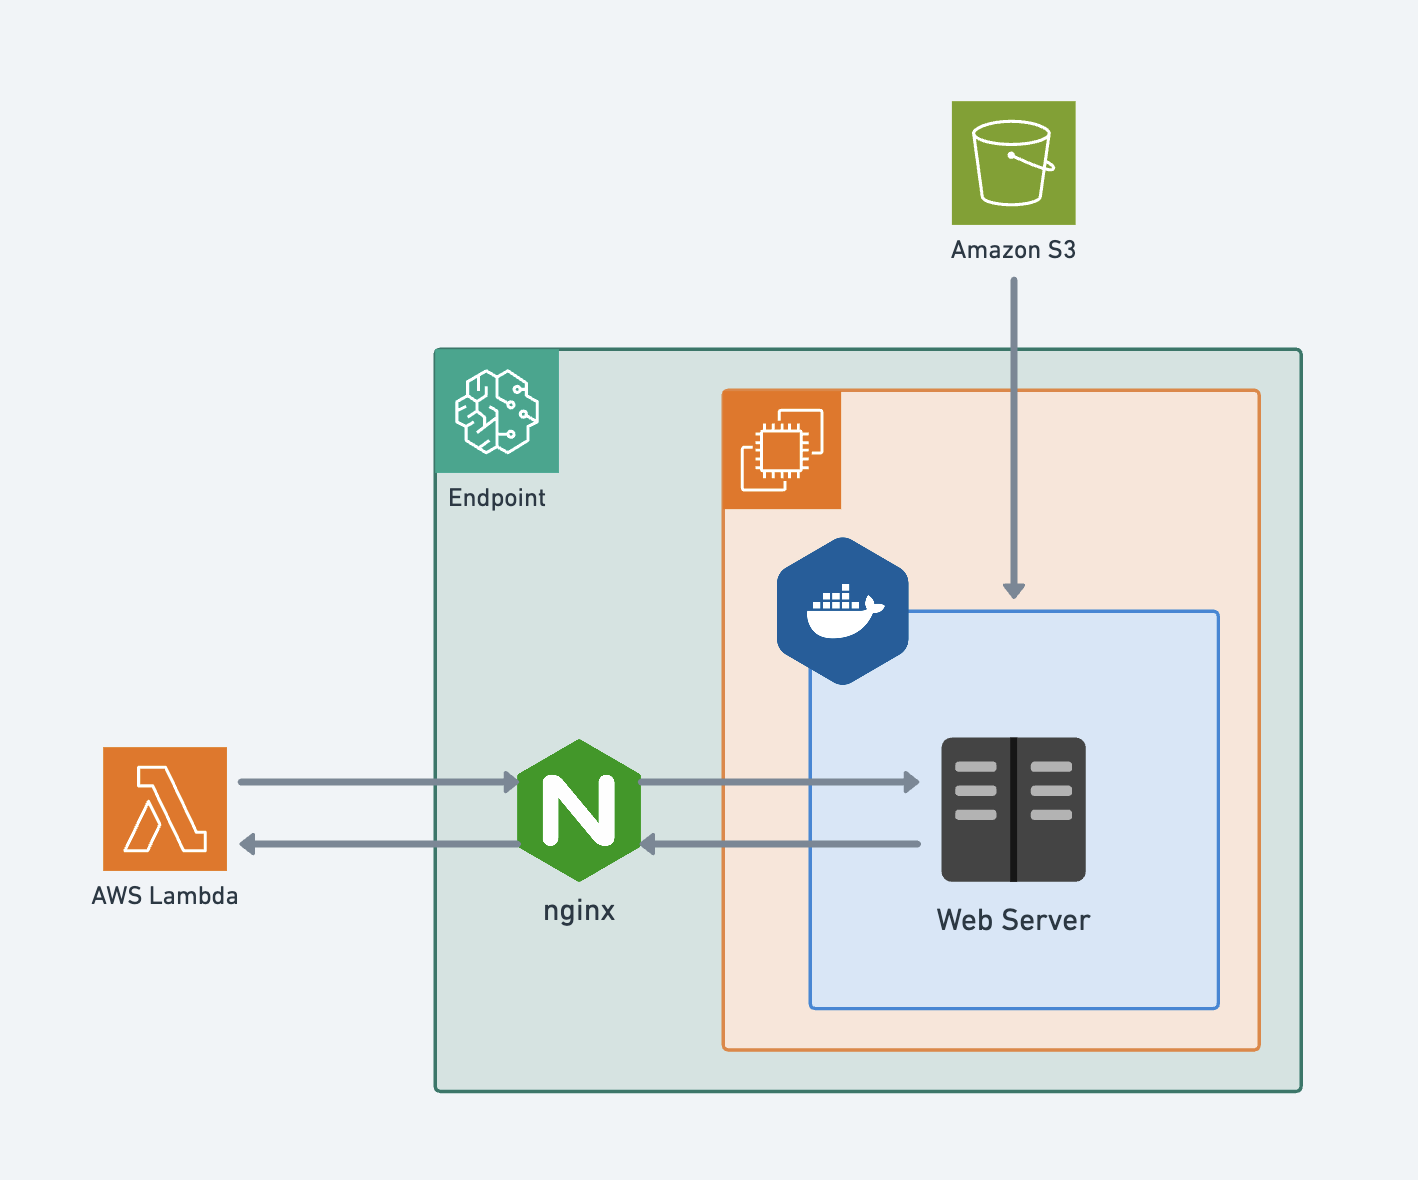
- Sagemaker Endpoint pulls the Docker Container from ECR where the model will run.
- S3 retrieves model-related files.
- When an API or user calls the Endpoint, it receives input in REST API format, processes it within the container, and returns the results.
- In this blog post, we’ll cover how to store models in S3, create containers, and ultimately create Sagemaker Endpoints.
- All the code below can be run more conveniently in a Jupyter Notebook within the Sagemaker Notebook environment.
When You Need to Deploy Custom Models 🤷🏻♂️
- When working in the AWS Sagemaker environment, there are cases where deploying models using only Sagemaker’s provided environment becomes challenging.
- For example, when you need to use packages that AWS Sagemaker doesn’t provide in its environment—beyond commonly used packages like Tensorflow, PyTorch, and XGBoost—you’ll need to create and deploy custom Docker containers for model training and deployment.
- Deploying customized models in Sagemaker involves the following steps:
- Writing Sagemaker model serving scripts
- Uploading models to S3
- Uploading custom Docker images to AWS ECR
- Creating models in SageMaker
- Creating Endpoint Configuration
- Creating Endpoints
- Calling Endpoints
1. Writing Sagemaker Model Serving Scripts (inference.py)
- First, you need to write Python code that handles model and input/output data processing in Sagemaker Endpoints.
inference.pyincludes code for preprocessing input requests, performing inference, and postprocessing inference results.model_fn: A function that takes the path where the model is stored as input, recreates the model, and returns the model and model-related information.input_fn: Receives input data as raw data and returns data formatted for model input.predict_fn: Takes data transformed byinput_fnand the model as input, performs postprocessing on the final results, and returns the outcome.output_fn: Receives the postprocessed final results, converts them to JSON format, and returns the final output format.
inference.pycan be written in the following format. The internal logic of each function can be further customized as needed.
# inference.py

def model_fn(model_dir):
    ...
    return model, transform

def input_fn(request_body, request_content_type):
    ...
    return inputs

def predict_fn(input_data, model):
    ...
    return processed_data

def output_fn(prediction, accept):
    ...
    return json.dumps(prediction), accept
- To debug whether
inference.pyworks properly, use the following temporary code to check if results are returned correctly.
import json
from inference import model_fn, predict_fn, input_fn, output_fn

response, accept = output_fn(
    predict_fn(
        input_fn(payload, "text/csv"),
        model_fn("./")
    ),
    "application/json"
)

json.loads(response)
2. Uploading Models to S3
- Once you’ve confirmed that
inference.pyworks correctly, it’s time to store the model in S3. - Before uploading the model, first compress the necessary files for the model and
inference.pyinto a single archive file.- In Sagemaker, we typically compress files in
tar.gzformat.
- In Sagemaker, we typically compress files in
tar -czvf ./model.tar.gz -C ./ model.joblib inference.py
- After compressing the model, upload it to S3 using boto3.
import boto3
from datetime import datetime
bucket = "bucket_name"
object_key = f"model_function/model.tar.gz"

s3 = boto3.resource('s3')
s3.meta.client.upload_file("./model.tar.gz", bucket, object_key)
3. Uploading Custom Docker Images to AWS ECR
- Now that you’ve uploaded the trained model to S3, it’s time to set up the environment where the model will run.
- First, log in to the AWS ECR registry in the sagemaker environment.
# Authenticate docker to Amazon ECR registry
aws ecr get-login-password --region $REGION | docker login --username AWS --password-stdin <docker_registry_url>.dkr.ecr.$REGION.amazonaws.com

# Log in to Amazon ECR registry
aws ecr get-login-password --region $REGION | docker login --username AWS --password-stdin $ACCOUNT.dkr.ecr.$REGION.amazonaws.com
- After logging into ECR, create a Dockerfile to build the container you’ll push to ECR. Depending on your project, you can use images from AWS-provided registries as a base and configure the necessary environment settings.
- You can search for image URLs provided in the AWS Seoul Region at the link below:
AWS Seoul Region Docker Registry URL
# Base image
FROM <docker_registry_url>.dkr.ecr.<my_aws_region>.amazonaws.com/pytorch-inference:2.0.0-gpu-py310

# Install additional required packages / environment setup
RUN pip install workalendar
...
- Once the Dockerfile is complete, build the Docker Image using the build command.
docker build -t model-project .
- After the build is complete, create a repository in ECR and push the image to the created repository.
# Create AWS ECR repository
aws ecr create-repository --repository-name model-project

docker tag model-project:latest $ACCOUNT.dkr.ecr.$REGION.amazonaws.com/model-project:latest

# Push tagged image to repository
docker push $ACCOUNT.dkr.ecr.$REGION.amazonaws.com/model-project:latest
- Once this is complete, you’ve finished all the model and Docker environment setup needed for deployment.
- Now let’s deploy the created model and container to Sagemaker!
4. Creating Models in SageMaker
- First, you need to register the model in the Sagemaker Model Registry.
- Model registration can be done with the following Python code.
- Here, you’ll use the S3 URI where the model is stored and the ECR URL where the Docker container is stored.
import boto3
import sagemaker

sagemaker_client = boto3.client(service_name="sagemaker")
role = sagemaker.get_execution_role()

bucket = "bucket_name"
object_key = f"model_function/model.tar.gz"

model_name = f"model-test"

primary_container = {
    "Image": f"{my_aws_account}.dkr.ecr.{my_aws_region}.amazonaws.com/model-project:latest",
    "ModelDataUrl": f"s3://{bucket}/{object_key}"
}

create_model_response = sagemaker_client.create_model(
    ModelName=model_name,
    ExecutionRoleArn=role,
    PrimaryContainer=primary_container)
5. Creating Endpoint Configuration
- Once model registration is complete, create an endpoint configuration with the registered model.
- Endpoint Configuration is a setup that configures the environment where the model and container will run.
```python endpoint_config_name = f”ai-vad-model-config”
sagemaker_client